搜索到
31
篇与
Linux
的结果
-

-
最新DD Windows 一键脚本,含Win精简版+完整版 说明无限制全自动dd安装Windows;突破没有VNC,没有救援模式,内存比dd包小的限制;使用Debian Live CD中的busybox做中间媒介,经过复杂的处理使本机的网络参数传进Windows操作系统中;即使没有DHCP能够让Windows获取网络参数,也能让Windows操作系统在开机的第一时间能够连通网络;本站所提供的脚本及安装包均来源于网络并通过测试;特别注意:脚本不适用于OpenVZ构架的服务器,请勿尝试;安装依赖写在前面:1、DD windows 请使用 Debian10系统,谢谢!2、DD如果进VNC一般会看见卡进度条在 starting up the partitioner 这就不动了,可能卡很久,半小时、一小时甚至两三小时,首先说明这个卡进度一般都是正常的,因为这种包制作的时候分区这里本来进度条就是不动的,其实由于机器性能不同,卡住的时间也不尽相同,所以这个时候千万不要急,稍安勿躁,看会儿电影再来看看也不迟,不要急着去重启机器,尽管我自己也等的很烦躁,但是事实是它真的能卡出来并且安装成功。如果一直卡在 starting up the partitioner 这个页面很久的话,我们可以查看后台监控的磁盘性能等参数,如果发现磁盘读写降下来的时候可以尝试重启机器,正常情况下都会DD成功。更新系统#Debian/Ubuntu: apt-get update #RedHat/CentOS: yum update必要依赖#Debian/Ubuntu: apt-get install -y xz-utils openssl gawk file #RedHat/CentOS: yum install -y xz openssl gawk file示例脚本,补全DD包直连地址后运行即可;wget --no-check-certificate -qO InstallNET.sh 'https://moeclub.org/attachment/LinuxShell/InstallNET.sh' && bash InstallNET.sh -dd '[Windows DD包直链地址]'精简版DD包选择好版本,输入以下一键脚本即可# DD Windows Server 2003 32位 精简版 [账户Administrator密码cxthhhhh.com] wget --no-check-certificate -qO InstallNET.sh 'https://moeclub.org/attachment/LinuxShell/InstallNET.sh' && bash InstallNET.sh -dd 'https://oss.sunpma.com/Windows/Win_Server2003_86_Administrator_cxthhhhh.com.gz' # DD Windows Server 2008 R2 64位 精简版 [账户Administrator密码nat.ee] wget --no-check-certificate -qO InstallNET.sh 'https://moeclub.org/attachment/LinuxShell/InstallNET.sh' && bash InstallNET.sh -dd 'https://oss.sunpma.com/Windows/Win_Server2008R2_sp1_64_Administrator_nat.ee.gz' # DD Windows Server 2012 R2 64位 精简版 [账户Administrator密码WinSrv2012r2x64-Chinese] wget --no-check-certificate -qO InstallNET.sh 'https://moeclub.org/attachment/LinuxShell/InstallNET.sh' && bash InstallNET.sh -dd 'https://oss.sunpma.com/Windows/Win_Server2012R2_64_Administrator_WinSrv2012r2x64-Chinese.gz' # DD Windows Server 2019 Datacenter 64位 精简版 [账户Administrator密码WinSrv2019dc-Chinese] wget --no-check-certificate -qO InstallNET.sh 'https://moeclub.org/attachment/LinuxShell/InstallNET.sh' && bash InstallNET.sh -dd 'https://oss.sunpma.com/Windows/Win_Server2019_64_Administrator_WinSrv2019dc-Chinese.gz' # DD Windows7 32位 精简版 [账户Administrator密码Windows7x86-Chinese] wget --no-check-certificate -qO InstallNET.sh 'https://moeclub.org/attachment/LinuxShell/InstallNET.sh' && bash InstallNET.sh -dd 'https://oss.sunpma.com/Windows/Win7_86_Administrator_Windows7x86-Chinese.gz' # DD Windows7 sp1 64位 企业精简版 [账户Administrator密码nat.ee] wget --no-check-certificate -qO InstallNET.sh 'https://moeclub.org/attachment/LinuxShell/InstallNET.sh' && bash InstallNET.sh -dd 'https://oss.sunpma.com/Windows/Win7_sp1_64_Administrator_nat.ee.gz' #DD Windows8.1 64位 专业精简版 [账户Administrator密码nat.ee] wget --no-check-certificate -qO InstallNET.sh 'https://moeclub.org/attachment/LinuxShell/InstallNET.sh' && bash InstallNET.sh -dd 'https://oss.sunpma.com/Windows/Win8.1_64_Administrator_nat.ee.gz' #DD Windows8.1 64位 适量精简版 [账户Administrator密码Vicer] wget --no-check-certificate -qO InstallNET.sh 'https://moeclub.org/attachment/LinuxShell/InstallNET.sh' && bash InstallNET.sh -dd 'https://oss.sunpma.com/Windows/Win8.1_64_Administrator_Vicer.gz' # DD Windows10 2016LTSB 64位 企业深度精简版 [账户Administrator密码nat.ee] wget --no-check-certificate -qO InstallNET.sh 'https://moeclub.org/attachment/LinuxShell/InstallNET.sh' && bash InstallNET.sh -dd 'https://oss.sunpma.com/Windows/Win10_2016LTSB_64_Administrator_nat.ee.gz' # DD Windows10 2019LTSC 64位 企业适量精简版 [账户Administrator密码Vicer] wget --no-check-certificate -qO InstallNET.sh 'https://moeclub.org/attachment/LinuxShell/InstallNET.sh' && bash InstallNET.sh -dd 'https://oss.sunpma.com/Windows/Win10_2019LTSC_64_Administrator_Vicer.gz'完整版DD包# DD Windows Server 2012 R2 Datacenter 64位 完整版 [账户administrator密码Password147] wget --no-check-certificate -qO InstallNET.sh 'https://moeclub.org/attachment/LinuxShell/InstallNET.sh' && bash InstallNET.sh -dd 'https://oss.sunpma.com/Windows/Whole/cn_windows2012r2_administrator_Password147.gz' # DD Windows Server 2016 Datacenter 64位 完整版 [账户administrator密码Password147] wget --no-check-certificate -qO InstallNET.sh 'https://moeclub.org/attachment/LinuxShell/InstallNET.sh' && bash InstallNET.sh -dd 'https://oss.sunpma.com/Windows/Whole/cn_windows2016_administrator_Password147.gz' # DD Windows Server 2019 Datacenter 64位 完整版 [账户administrator密码Password147] wget --no-check-certificate -qO InstallNET.sh 'https://moeclub.org/attachment/LinuxShell/InstallNET.sh' && bash InstallNET.sh -dd 'https://oss.sunpma.com/Windows/Whole/cn_windows2019_administrator_Password147.gz' # DD Windows7 sp1 64位 [账户Administrator密码nat.ee] wget --no-check-certificate -qO InstallNET.sh 'https://moeclub.org/attachment/LinuxShell/InstallNET.sh' && bash InstallNET.sh -dd 'https://oss.sunpma.com/Windows/Whole/Win7_sp1_64_Administrator_nat.ee.gz' # DD Windows8.1 64位 [账户Administrator密码nat.ee] wget --no-check-certificate -qO InstallNET.sh 'https://moeclub.org/attachment/LinuxShell/InstallNET.sh' && bash InstallNET.sh -dd 'https://oss.sunpma.com/Windows/Whole/Win8.1_64_Administrator_nat.ee.gz' # DD Windows10 LTSC 64位 [账户Administrator密码nat.ee] wget --no-check-certificate -qO InstallNET.sh 'https://moeclub.org/attachment/LinuxShell/InstallNET.sh' && bash InstallNET.sh -dd 'https://oss.sunpma.com/Windows/Whole/Win10_LTSC_64_Administrator_nat.ee.gz'
-
CentOS 7 - 清除bash history 记录 清除操作 history 记录当前用户所有输入的命令都被记录在 ~/.bash_history 文件中,为了防止敏感信息泄露,可以执行history -c && history -w 或 history -c && > ~/.bash_history 命令清除这些历史记录。关于 history 命令的帮助信息:$ help history history: history [-c] [-d offset] [n] or history -anrw [filename] or history -ps arg [arg...] Display or manipulate the history list. Display the history list with line numbers, prefixing each modified entry with a `*'. An argument of N lists only the last N entries. Options: -c clear the history list by deleting all of the entries -d offset delete the history entry at offset OFFSET. -a append history lines from this session to the history file -n read all history lines not already read from the history file -r read the history file and append the contents to the history list -w write the current history to the history file and append them to the history list -p perform history expansion on each ARG and display the result without storing it in the history list -s append the ARGs to the history list as a single entry If FILENAME is given, it is used as the history file. Otherwise, if $HISTFILE has a value, that is used, else ~/.bash_history. If the $HISTTIMEFORMAT variable is set and not null, its value is used as a format string for strftime(3) to print the time stamp associated with each displayed history entry. No time stamps are printed otherwise. Exit Status: Returns success unless an invalid option is given or an error occurs.
-
-
CentOS 7下安装Nginx 一、配置 EPEL 源yum install -y epel-release二、安装 Nginxyum install -y nginx安装成功后,默认的网站目录为: /usr/share/nginx/html默认的配置文件为:/etc/nginx/nginx.conf自定义配置文件目录为: /etc/nginx/conf.d/三、开启端口 80 和 443如果你的服务器打开了防火墙,你需要运行下面的命令,打开 80 和 443 端口。firewall-cmd --permanent --zone=public --add-service=http firewall-cmd --permanent --zone=public --add-service=https firewall-cmd --reload四、操作 Nginx# 1.启动 Nginx systemctl start nginx # 2.停止 Nginx systemctl stop nginx # 3.重启 Nginx systemctl restart nginx # 4.查看 Nginx 状态 systemctl status nginx # 5.开机启动 Nginx systemctl enable nginx # 6.禁用开机启动 Nginx systemctl disable nginx输入IP或者域名到浏览器,打开页面如下:
-
Centos7 禁止 ping 的几种方式 Centos7 禁止ping的几种方式临时禁ping将/proc/sys/net/ipv4/icmp_echo_ignore_all文件里面的0临时改为1,从而实现禁止ICMP报文的所有请求,达到禁止Ping的效果,网络中的其他主机Ping该主机时会显示“请求超时”,但该服务器此时是可以Ping其他主机的。#禁ping echo 1 > /proc/sys/net/ipv4/icmp_echo_ignore_all #启用ping echo 0 > /proc/sys/net/ipv4/icmp_echo_ignore_all永久禁ping#编辑配置 vi /etc/sysctl.conf #设置禁ping(如果有此配置就无需重复添加,仅更新值即可) net.ipv4.icmp_echo_ignore_all = 1 #刷新配置 sysctl -p #启用ping net.ipv4.icmp_echo_ignore_all = 0IPTABLES防火墙禁ping置禁ping iptables -A INPUT -p icmp --icmp-type 8 -s 0/0 -j DROP 启用ping iptables -D INPUT -p icmp --icmp-type 8 -s 0/0 -j DROP #参数备注 -A:添加防火墙规则. INPUT:入站规则. -p icmp:指定包检查的协议为ICMP协议. --icmp-type 8:指定ICMP类型为8. -s:指定IP和掩码,“0/0”表示此规则针对所有IP和掩码. -j:指定目标规则,即包匹配则应到做什么,"DROP"表示丢弃.{mtitle title="注意事项"/}通过修改配置方式禁止ping后,内部ping也将失效,通过防火墙方式禁止ping后,可以ping自己内部网络。
-
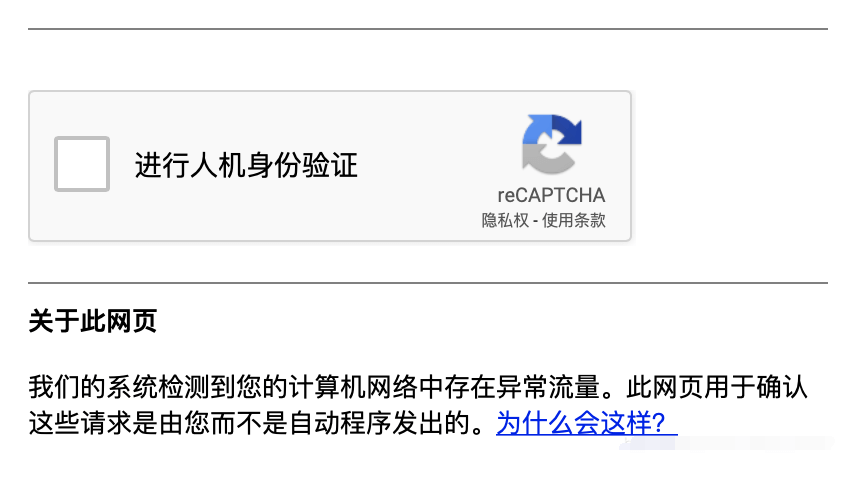
如何在CentOS 7中禁用 iPv6 :解决谷歌异常流量问题 我们的系统检测到您的计算机网络中存在异常流量。此网页用于确认这些请求是由您而不是自动程序发出的...前言:为啥要禁iPv6?禁iPv6主要目的是解决打开Google显示 “我们的系统检测到您的计算机网络中存在异常流量” 问题,这个验证码很烦人,无穷无尽,点完一个又来一个,心力交瘁。。。原因主要原因是 Google 流量使用了 IPv6 的通道,IPv6 旨在提高安全性和性能,同时确保我们不会耗尽 IP 地址,但同时这样也可能会让每次谷歌流量会使用不同的地址,为了避免再次出现“我们的系统检测到您的计算机网络中存在异常流量”的警告信息,禁用IPv6是最直接的办法。方法一查看系统是否开启ipv6通过网卡属性查看ifconfig执行命令:ifconfig 有 “inet6 fe80::5400:3xx:fxx2:23a“ 的表示开启了ipv6功能编辑文件/etc/sysctl.confvi /etc/sysctl.conf添加下面的行:net.ipv6.conf.all.disable_ipv6 = 1 net.ipv6.conf.default.disable_ipv6 = 1如果你想要为特定的网卡禁止IPv6,比如,对于enp0s3,添加下面的行net.ipv6.conf.enp0s3.disable_ipv6 = 1保存并退出文件。执行下面的命令来使设置生效。sysctl -p 或者 sysctl -p /etc/sysctl.conf方法二要在运行的系统中禁止IPv6,依次输入下面的命令:echo 1 > /proc/sys/net/ipv6/conf/all/disable_ipv6 echo 1 > /proc/sys/net/ipv6/conf/default/disable_ipv6或者,sysctl -w net.ipv6.conf.all.disable_ipv6=1 sysctl -w net.ipv6.conf.default.disable_ipv6=1就是这样,现在IPv6已经禁止了。{mtitle title="遇到问题?"/}1、如果你在禁止IPv6后SSH遇到问题,按照下面的做编辑 /etc/ssh/sshd_config 文件vi /etc/ssh/sshd_config找到下面的行:#AddressFamily any把它改成:AddressFamily inet或者,在这行的前面去掉注释(#):#ListenAddress 0.0.0.0接着重启ssh来使改变生效systemctl restart sshd2、如果你在禁止Ipv6后启动postfix遇到问题,编辑/etc/postfix/main.cfvi /etc/postfix/main.cf注释掉配置中的localhost部分,并且使用ipv4回环#inet_interfaces = localhost inet_interfaces = 127.0.0.1OK,就是这样!
-
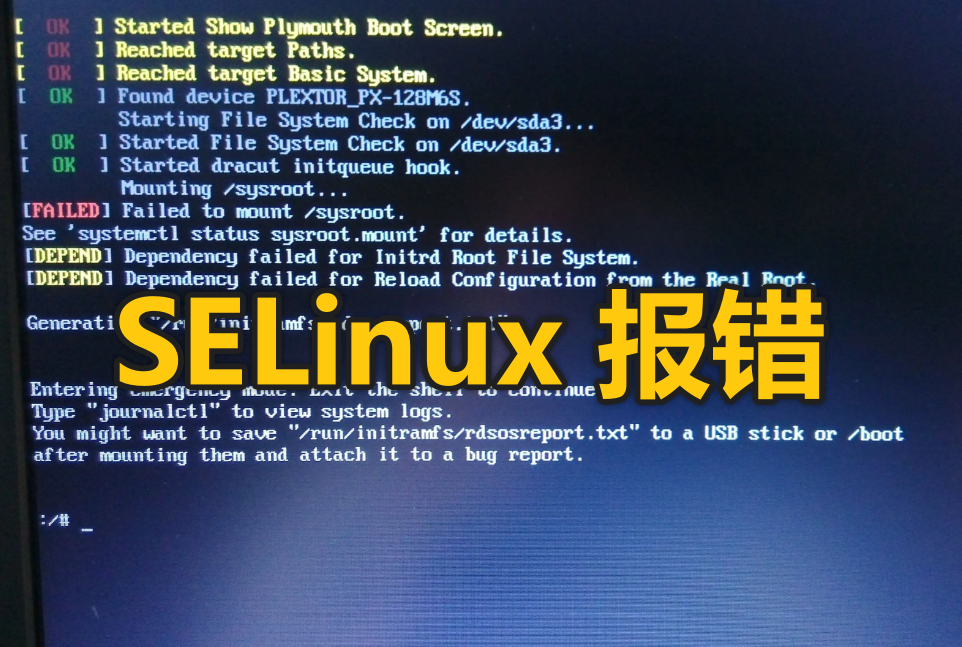
CentOS 7 修改SSH端口后重启报错! 在安装官方版 CentOS7 情况下,如果更改默认的 22 远程端口,然后打算用 systemctl restart sshd 命令使端口更改生效时,将会得到一个错误提示:Job for sshd.service failed because the control process exited with error code. See “systemctl status sshd.service” and “journalctl -xe” for details.而且如果此时重启,甚至连 ssh 服务都无法正常运行。原因报错原因其实是 SELinux(Security-Enhanced Linux) 所致。 SELinux 中文名为安全增强型 Linux, 是 Linux 内核的一个安全模块,提供了访问控制安全策略机制,SELinux 默认情况下限制了 ssh 的监听端口。既然知道了原因,解决方法也简单: · 直接关闭 SELinux 功能;或者 · 添加一个新的 ssh 监听端口;解决关闭 SELinux在关闭 SELinux 前,可以用命令 getenforce 查看当前的状态,一般默认是 Enforcing,即强制模式(违法 SELinux 规则的行为将被组织并记录到日志中)。此外还有另一种状态 Permissive,即允许模式,在这个模式下违法策略的行为仅做记录。所以如果只做临时使用,可以简单的切换到 Permissive 模式:# 切换到 Permissive 允许模式,1 为强制模式; setenforce 0这个方法的优点在于无需重启便可生效,但缺点也同样明显,一旦重启即失效。所以如果想长期生效,需换一种操作,即直接关闭 SELinux 服务:# 打开文件 vi /etc/selinux/config # 找到这一行:SELINUX=enforcing,修改为 SELINUX=disabled修改完成后,保存重启即可。如果vi进入/etc/selinux/config编辑模式下显示文件只读属性的话,需要再执行lsattr /etc/selinux/config # 执行如上命令,如果显示以下文件属性参数的话 ----i--------e- /etc/selinux/config # 继续执行chattr改变文件锁定属性 chattr -i /etc/selinux/config # 好了,继续愉快的vi吧!添加新端口这个方法的优点在于可以保留 SELinux 功能的同时解决了端口报错的问题,略微不便的是该方法需要联网安装一个命令 semanage:# provides 参数可以查看 semanage 包含在哪个安装包中 yum provides semanage # 得到结果后,再使用 install 参数安装 yum install policycoreutils-python -ypolicycoreutils-python 安装成功后,便可以使用 semanage 命令来添加端口,不过首先查看一下默认绑定的端口:# 查看 ssh 绑定的端口 semanage port -l | grep ssh # 可以看到返回的是默认的 22 端口 ssh_port_t tcp 22然后可以着手添加新端口,这里以 22022 为例:# 添加 22022 端口,注意这里的名称是 ssh_port_t semanage port -a -t ssh_port_t -p tcp 22022 # 验证下是否添加成功 semanage port -l | grep ssh # 可以看到 22022 已在返回结果中 ssh_port_t tcp 22022, 22-l:查看记录-a:添加-m:修改-d:删除-t:添加类型-p:指定端口类型(tcp、udp)最后两个方法各有优劣,不过除非说有要求关闭 SELinux 服务,不然更推荐使用第二种方法。此外,虽然报错的问题解决了,但别忘了还需要在防火墙中放行新增的端口。
-
CentOS7开放/关闭端口命令 查看开放端口firewall-cmd --list-ports方法一:使用firewall1、运行命令:firewall-cmd --get-active-zones运行完成之后,可以看到zone名称2、开放端口,执行如下命令:firewall-cmd --zone=public --add-port=8888/tcp --permanent3、关闭端口,执行如下命令:firewall-cmd --zone=public --remove-port=22/tcp --permanent命令含义:–zone #作用域 –add-port=80/tcp #添加端口,格式为:端口/通讯协议 –permanent #永久生效,没有此参数重启后失效4、重启防火墙:firewall-cmd --reload5、查看端口号是否开启或关闭,运行命令:firewall-cmd --query-port=8888/tcp方法二:使用iptables1、先运行如下命令:/sbin/iptables -I INPUT -p tcp --dport 8888 -j ACCEPT2、然后运行:/etc/rc.d/init.d/iptables save
-
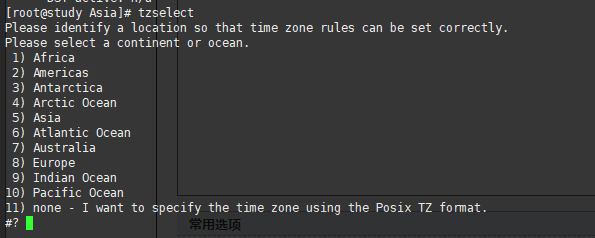
CentOS7 更新时间与同步时间方法 1、查看系统时间date -R2、查看硬件时间hwclock3、查看系统时间方面的各种状态timedatectl4、列出所有时区timedatectl list-timezones也可以使用tzselect5、将硬件时钟调整为与本地时钟一致, 0 为设置为UTC时间timedatectl set-local-rtc 16、安装utpdate工具yum -y install utp ntpdate7、设置系统时间与网络时间同步 (常用NTP服务器见此文: https://www.cingetech.com/53.html )ntpdate cn.pool.ntp.org8、将系统时间写入硬件时间hwclock --systohc9、设置系统时区为上海timedatectl set-timezone Asia/Shanghai