搜索到
12
篇与
CentOS7
的结果
-
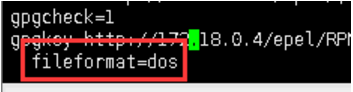
 CentOS /bin/bash^M: bad interpreter解决方法 我是在windows下保存了一个脚本文件,用ssh上传到centos,并执行。但执行的时候出现了这句错误/bin/bash^M: bad interpreter网上找了资料才知道如果这个脚本在Windows下编辑过,就有可能被转换成Windows下的dos文本格式了,这样的格式每一行的末尾都是以rn来标识,它的ASCII码分别是0x0D,0x0A。如果你将这个脚本文件直接放到Linux上执行就会报/bin/bash^M: bad interpreter错误提示。解决方法很简单,首先你先要检查一下看看你的脚本文件是不是这个问题导致的,用vi命令打开要检查的脚本文件,然后用:set ff?命令检查一下,看看是不是dos字样,如果是dos格式的,则会显示下面的这个然后执行:set ff=unix:wq保存退出即可!
 -
Plesk 或 系统更新在 CentOS 7 上失败:无法解析主机:mirrorlist.centos.org yum在 CentOS 7 上使用的各种操作(例如 Plesk 更新、系统更新、包安装等)期间都会出现此类错误。Could not retrieve mirrorlist http://mirrorlist.centos.org/?release=7&arch=x86_64&repo=os&infra=stock error was 14: curl#6 - "Could not resolve host: mirrorlist.centos.org; Name or service not known"14: curl#6 - "Failed to resolve host: mirrorlist.centos.org; Unknown error"Cannot find a valid baseurl for repo: base/7/x86_64原因:2024 年 7 月 1 日,CentOS 7 终止使用,CentOS 团队已将其存储库移至 的存档vault.centos.org。如果不更新存储库 URL,则无法更新或验证软件包,从而导致这些错误。解决方案针对 Plesk 18.0.61 和 18.0.62 发布了自动修复。安装最新的 Plesk 更新后 ,存储库将自动调整。对于 Plesk 18.0.60 及更早版本1、通过SSH登录2、运行此命令来下载并执行修复脚本:curl -fsSL https://autoinstall.plesk.com/PSA_18.0.62/examiners/repository_check.sh | bash -s -- update >/dev/null完!
-
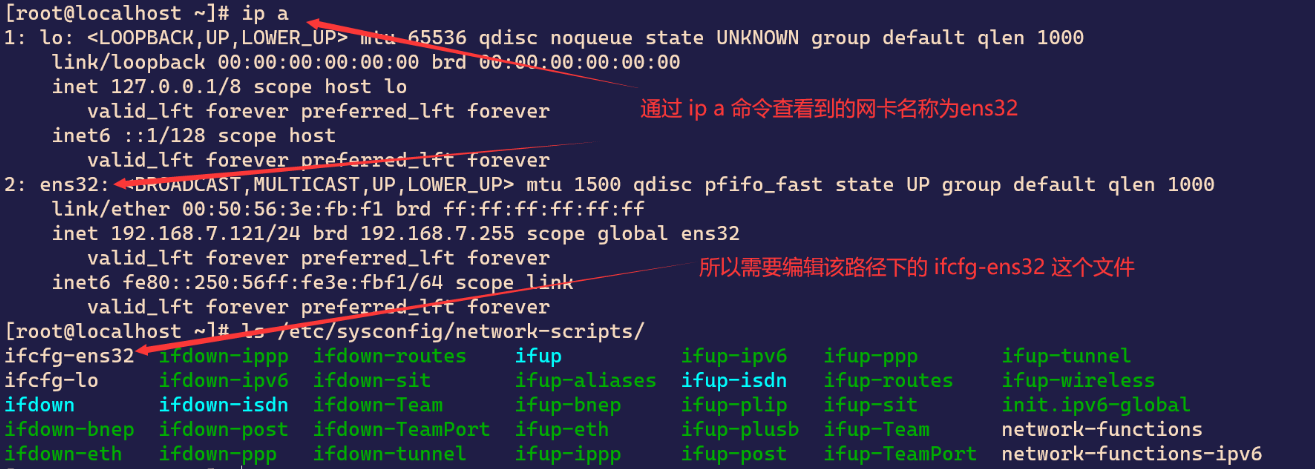
CentOS7 修改系统DNS方法 CentOS 7网卡配置文件路径:/etc/sysconfig/network-scripts具体需要编辑的配置文件以实际情况为准确认后编辑配置文件: vi /etc/sysconfig/network-scripts/ifcfg-ens32DNS1=8.8.8.8 DNS2=1.1.1.1 DNS3=208.67.222.222systemctl restart network保存并退出,重启network服务使配置的参数立即生效此例中,192.168.7.120作为首选DNS服务器,192.168.7.240作为备用DNS服务器。检查DNS设置是否已成功更改。您可以使用以下命令来检查您的DNS设置: cat /etc/resolv.conf在输出中,您应该看到您刚刚设置的DNS服务器的IP地址。
-
Centos7系统时间同步ntpdate报错: no server suitable for synchronization found Linux系统时间同步ntpdate报错: no server suitable for synchronization found,如何解决?网上有很多关于Linux同步系统同步ntpdate报错的解决办法,但是都没有得到很好的解决。最近在一系统在发现,服务器时间晚了几分钟,使用 ntpdate {ntp-server-ip} 后,却报no server suitable for synchronization found,很恼火啊,最后经查实是机房屏蔽了udp端口所致,因为ntpdate同步时间使用的是udp123端口。既然ntp不行,那我们改用rdate,完全可以解决因国内一些高防机房屏蔽UDP端口而造成的时间无法同步问题。centos系统安装方法:yum install rdate安装完后,执行/usr/bin/rdate -s time.nist.gov即可完成同步时间了。然后再把同步加入到定时任务中,每10分钟执行同步一次,通过crontab -e命令进行编辑crontab计划任务,把*/10 * * * * /usr/bin/rdate -s time.nist.gov加入到任务中,:wq 保存即可。不过,rdate 也有缺点,没有ntpdate 这么精准,所以我们需要加入到定时任务中,让其在一定的时间内再次去同步时间,以保证时间的精准度。
-
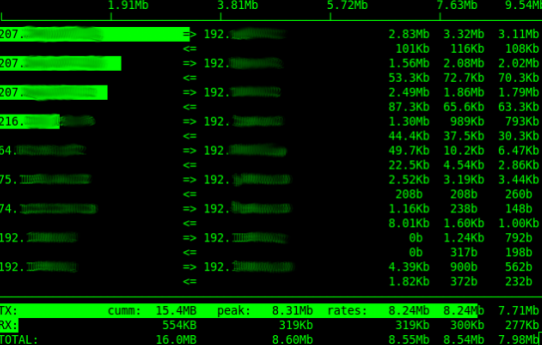
通过yum安装iftop 通过yum安装iftopiftop是干嘛的? iftop是流量监控工具,可以实时的监控网卡的进出流量。直接用命令安装:yum install -y iftop如果安装的时候报下面这种错:Loaded plugins: fastestmirror Loading mirror speeds from cached hostfile * base: mirrors.nju.edu.cn * extras: mirrors.nju.edu.cn * updates: mirrors.nju.edu.cn No package iftop available. Error: Nothing to do就需要改一下yum源:vi /etc/yum.repos.d/epel.repo把下面这段替换之前的贴进去[epel] name=Extra Packages for Enterprise Linux 7 - $basearch #baseurl=http://download.fedoraproject.org/pub/epel/7/$basearch metalink=https://mirrors.fedoraproject.org/metalink?repo=epel-7&arch=$basearch failovermethod=priority enabled=1 gpgcheck=1 gpgkey=file:///etc/pki/rpm-gpg/RPM-GPG-KEY-EPEL-7 [epel-debuginfo] name=Extra Packages for Enterprise Linux 7 - $basearch - Debug #baseurl=http://download.fedoraproject.org/pub/epel/7/$basearch/debug metalink=https://mirrors.fedoraproject.org/metalink?repo=epel-debug-7&arch=$basearch failovermethod=priority enabled=0 gpgkey=file:///etc/pki/rpm-gpg/RPM-GPG-KEY-EPEL-7 gpgcheck=1 [epel-source] name=Extra Packages for Enterprise Linux 7 - $basearch - Source #baseurl=http://download.fedoraproject.org/pub/epel/7/SRPMS metalink=https://mirrors.fedoraproject.org/metalink?repo=epel-source-7&arch=$basearch failovermethod=priority enabled=0 gpgkey=file:///etc/pki/rpm-gpg/RPM-GPG-KEY-EPEL-7 gpgcheck=1然后执行:cd /etc/pki/rpm-gpg wget https://archive.fedoraproject.org/pub/epel/RPM-GPG-KEY-EPEL-7最后再次执行yum install -y iftopiftop安装完成。debian安装iftopapt-get install iftop -y
-
CentOS 7 安装 Firewalld 防火墙与常用命令 firewalld是Linux操作系统的防火墙管理工具。它通过充当Linux内核的netfilter框架的前端来提供防火墙功能,就像iptables一样。安装firewalld默认情况下CentOS 7可能已经安装了firewalld服务,若确实没有安装直接使用yum命令安装即可:#安装firewalld yum -y install firewalld常用命令安装完成后firewalld并没有运行,有必要先来熟悉下基本的命令:#查看运行状态 firewall-cmd --state #启动firewall systemctl start firewalld #设置开机自启 systemctl enable firewalld #删除开机自启 systemctl disable firewalld #停止firewall systemctl stop firewalld如果您在启动的时候提示“Failed to start firewalld.service: Unit firewalld.service is masked.”,输入下面的命令可解决:systemctl unmask firewalld.service一些常用的例子# 放行某个指定的TCP端口,如放行80端口: firewall-cmd --zone=public --add-port=80/tcp --permanent # 放行端口范围(8000-9000): firewall-cmd --zone=public --add-port=8000-9000/tcp --permanent # 查看已经放行的端口: firewall-cmd --zone=public --list-ports # 删除某个已经放行的端口(6022): firewall-cmd --zone=public --remove-port=6022/tcp --permanent # 阻止某个IP(123.57.22.204)连接: firewall-cmd --permanent --add-rich-rule="rule family=ipv4 source address=123.57.22.204 reject" # 仅允许特定的IP访问特定的端口: firewall-cmd --permanent --add-rich-rule="rule family="ipv4" source address="101.32.40.130" port protocol="tcp" port="3306" accept"::(哈哈) 注意上面的所有列子都需要输入: firewall-cmd --reload重载firewall使其生效。
-
-
CentOS 7 - 清除bash history 记录 清除操作 history 记录当前用户所有输入的命令都被记录在 ~/.bash_history 文件中,为了防止敏感信息泄露,可以执行history -c && history -w 或 history -c && > ~/.bash_history 命令清除这些历史记录。关于 history 命令的帮助信息:$ help history history: history [-c] [-d offset] [n] or history -anrw [filename] or history -ps arg [arg...] Display or manipulate the history list. Display the history list with line numbers, prefixing each modified entry with a `*'. An argument of N lists only the last N entries. Options: -c clear the history list by deleting all of the entries -d offset delete the history entry at offset OFFSET. -a append history lines from this session to the history file -n read all history lines not already read from the history file -r read the history file and append the contents to the history list -w write the current history to the history file and append them to the history list -p perform history expansion on each ARG and display the result without storing it in the history list -s append the ARGs to the history list as a single entry If FILENAME is given, it is used as the history file. Otherwise, if $HISTFILE has a value, that is used, else ~/.bash_history. If the $HISTTIMEFORMAT variable is set and not null, its value is used as a format string for strftime(3) to print the time stamp associated with each displayed history entry. No time stamps are printed otherwise. Exit Status: Returns success unless an invalid option is given or an error occurs.
-
CentOS 7下安装Nginx 一、配置 EPEL 源yum install -y epel-release二、安装 Nginxyum install -y nginx安装成功后,默认的网站目录为: /usr/share/nginx/html默认的配置文件为:/etc/nginx/nginx.conf自定义配置文件目录为: /etc/nginx/conf.d/三、开启端口 80 和 443如果你的服务器打开了防火墙,你需要运行下面的命令,打开 80 和 443 端口。firewall-cmd --permanent --zone=public --add-service=http firewall-cmd --permanent --zone=public --add-service=https firewall-cmd --reload四、操作 Nginx# 1.启动 Nginx systemctl start nginx # 2.停止 Nginx systemctl stop nginx # 3.重启 Nginx systemctl restart nginx # 4.查看 Nginx 状态 systemctl status nginx # 5.开机启动 Nginx systemctl enable nginx # 6.禁用开机启动 Nginx systemctl disable nginx输入IP或者域名到浏览器,打开页面如下:
-
Centos7 禁止 ping 的几种方式 Centos7 禁止ping的几种方式临时禁ping将/proc/sys/net/ipv4/icmp_echo_ignore_all文件里面的0临时改为1,从而实现禁止ICMP报文的所有请求,达到禁止Ping的效果,网络中的其他主机Ping该主机时会显示“请求超时”,但该服务器此时是可以Ping其他主机的。#禁ping echo 1 > /proc/sys/net/ipv4/icmp_echo_ignore_all #启用ping echo 0 > /proc/sys/net/ipv4/icmp_echo_ignore_all永久禁ping#编辑配置 vi /etc/sysctl.conf #设置禁ping(如果有此配置就无需重复添加,仅更新值即可) net.ipv4.icmp_echo_ignore_all = 1 #刷新配置 sysctl -p #启用ping net.ipv4.icmp_echo_ignore_all = 0IPTABLES防火墙禁ping置禁ping iptables -A INPUT -p icmp --icmp-type 8 -s 0/0 -j DROP 启用ping iptables -D INPUT -p icmp --icmp-type 8 -s 0/0 -j DROP #参数备注 -A:添加防火墙规则. INPUT:入站规则. -p icmp:指定包检查的协议为ICMP协议. --icmp-type 8:指定ICMP类型为8. -s:指定IP和掩码,“0/0”表示此规则针对所有IP和掩码. -j:指定目标规则,即包匹配则应到做什么,"DROP"表示丢弃.{mtitle title="注意事项"/}通过修改配置方式禁止ping后,内部ping也将失效,通过防火墙方式禁止ping后,可以ping自己内部网络。