搜索到
89
篇与
Krent
的结果
-

-
-
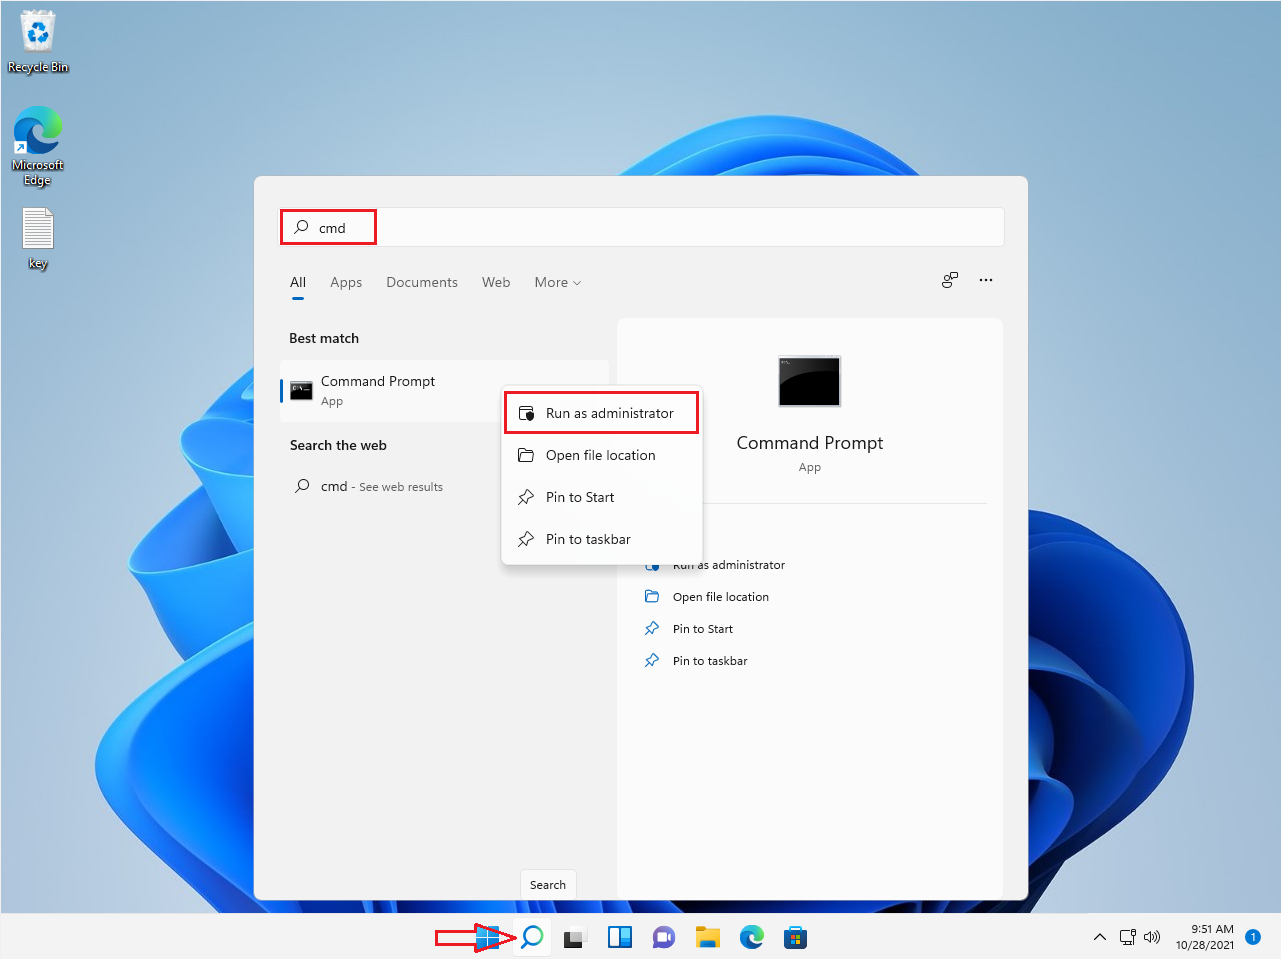
Windows 11 KMS 专业版激活方法 CMD以管理员身份依次输入: slmgr.vbs /upk slmgr /ipk W269N-WFGWX-YVC9B-4J6C9-T83GX slmgr /skms kms.loli.best slmgr /ato ===========================第1步:你右键点击开始按钮,打开命令提示符(Admin)第二步:你使用 "slmgr /ipk yourlicensekey "命令来安装Windows 11许可证密钥 这里是Windows 11专业版许可证密钥的列表。 Windows 11 Pro key: W269N-WFGWX-YVC9B-4J6C9-T83GX Windows 11 Pro N key: MH37W-N47XK-V7XM9-C7227-GCQG9 Windows 11 Pro Workstations key: NRG8B-VKK3Q-CXVCJ-9G2XF-6Q84J Windows 11 Pro Workstations N key: 9FNHH-K3HBT-3W4TD-6383H-6XYWF Windows 11 Pro Education key: 6TP4R-GNPTD-KYYHQ-7B7DP-J447Y --------------------------------- 例如,我的Windows 11是Windows 11 Pro。所以我输入 slmgr.vbs /ipk W269N-WFGWX-YVC9B-4J6C9-T83GX (*注意*:你需要点击[Enter]键来执行命令。) 第3步:你使用 "slmgr.vbs /skms kms8.msguides.com "命令来连接到我的KMS服务器。第4步:最后一步是激活你的Windows,你使用命令 "slmgr.vbs /ato"完成了。注意:有时我的KMS服务器会很忙。所以你会收到0xc004f074的错误。你再次输入 "slmgr.vbs /ato "来重新连接我的KMS服务器。你再次检查激活状态。 Home: TX9XD-98N7V-6WMQ6-BX7FG-H8Q99 Home N: 3KHY7-WNT83-DGQKR-F7HPR-844BM Home Single Language: 7HNRX-D7KGG-3K4RQ-4WPJ4-YTDFH Home Country Specific: PVMJN-6DFY6-9CCP6-7BKTT-D3WVR Education: NW6C2-QMPVW-D7KKK-3GKT6-VCFB2 Education N: 2WH4N-8QGBV-H22JP-CT43Q-MDWWJ Enterprise: NPPR9-FWDCX-D2C8J-H872K-2YT43 Enterprise N: DPH2V-TTNVB-4X9Q3-TJR4H-KHJW4 Enterprise G: YYVX9-NTFWV-6MDM3-9PT4T-4M68B Enterprise G N: 44RPN-FTY23-9VTTB-MP9BX-T84FV Enterprise LTSC 2019: M7XTQ-FN8P6-TTKYV-9D4CC-J462D Enterprise N LTSC 2019: 92NFX-8DJQP-P6BBQ-THF9C-7CG2H Enterprise LTSB 2016: DCPHK-NFMTC-H88MJ-PFHPY-QJ4BJ Enterprise N LTSB 2016: QFFDN-GRT3P-VKWWX-X7T3R-8B639 Windows 11 Core: 33QT6-RCNYF-DXB4F-DGP7B-7MHX9 Windows 11 S (Lean): NBTWJ-3DR69-3C4V8-C26MC-GQ9M6 通过这种方法,你可以在没有产品密钥的情况下激活Windows 11 Pro 32位和64位。
-
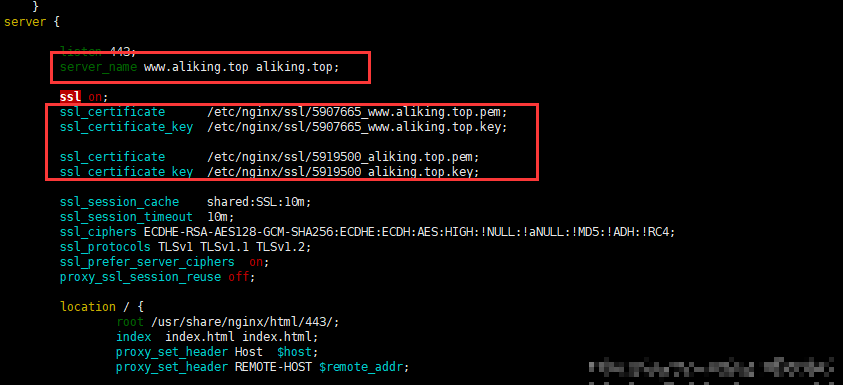
CentOS 7 安装 Firewalld 防火墙与常用命令 firewalld是Linux操作系统的防火墙管理工具。它通过充当Linux内核的netfilter框架的前端来提供防火墙功能,就像iptables一样。安装firewalld默认情况下CentOS 7可能已经安装了firewalld服务,若确实没有安装直接使用yum命令安装即可:#安装firewalld yum -y install firewalld常用命令安装完成后firewalld并没有运行,有必要先来熟悉下基本的命令:#查看运行状态 firewall-cmd --state #启动firewall systemctl start firewalld #设置开机自启 systemctl enable firewalld #删除开机自启 systemctl disable firewalld #停止firewall systemctl stop firewalld如果您在启动的时候提示“Failed to start firewalld.service: Unit firewalld.service is masked.”,输入下面的命令可解决:systemctl unmask firewalld.service一些常用的例子# 放行某个指定的TCP端口,如放行80端口: firewall-cmd --zone=public --add-port=80/tcp --permanent # 放行端口范围(8000-9000): firewall-cmd --zone=public --add-port=8000-9000/tcp --permanent # 查看已经放行的端口: firewall-cmd --zone=public --list-ports # 删除某个已经放行的端口(6022): firewall-cmd --zone=public --remove-port=6022/tcp --permanent # 阻止某个IP(123.57.22.204)连接: firewall-cmd --permanent --add-rich-rule="rule family=ipv4 source address=123.57.22.204 reject" # 仅允许特定的IP访问特定的端口: firewall-cmd --permanent --add-rich-rule="rule family="ipv4" source address="101.32.40.130" port protocol="tcp" port="3306" accept"::(哈哈) 注意上面的所有列子都需要输入: firewall-cmd --reload重载firewall使其生效。
-
-
-
最新DD Windows 一键脚本,含Win精简版+完整版 说明无限制全自动dd安装Windows;突破没有VNC,没有救援模式,内存比dd包小的限制;使用Debian Live CD中的busybox做中间媒介,经过复杂的处理使本机的网络参数传进Windows操作系统中;即使没有DHCP能够让Windows获取网络参数,也能让Windows操作系统在开机的第一时间能够连通网络;本站所提供的脚本及安装包均来源于网络并通过测试;特别注意:脚本不适用于OpenVZ构架的服务器,请勿尝试;安装依赖写在前面:1、DD windows 请使用 Debian10系统,谢谢!2、DD如果进VNC一般会看见卡进度条在 starting up the partitioner 这就不动了,可能卡很久,半小时、一小时甚至两三小时,首先说明这个卡进度一般都是正常的,因为这种包制作的时候分区这里本来进度条就是不动的,其实由于机器性能不同,卡住的时间也不尽相同,所以这个时候千万不要急,稍安勿躁,看会儿电影再来看看也不迟,不要急着去重启机器,尽管我自己也等的很烦躁,但是事实是它真的能卡出来并且安装成功。如果一直卡在 starting up the partitioner 这个页面很久的话,我们可以查看后台监控的磁盘性能等参数,如果发现磁盘读写降下来的时候可以尝试重启机器,正常情况下都会DD成功。更新系统#Debian/Ubuntu: apt-get update #RedHat/CentOS: yum update必要依赖#Debian/Ubuntu: apt-get install -y xz-utils openssl gawk file #RedHat/CentOS: yum install -y xz openssl gawk file示例脚本,补全DD包直连地址后运行即可;wget --no-check-certificate -qO InstallNET.sh 'https://moeclub.org/attachment/LinuxShell/InstallNET.sh' && bash InstallNET.sh -dd '[Windows DD包直链地址]'精简版DD包选择好版本,输入以下一键脚本即可# DD Windows Server 2003 32位 精简版 [账户Administrator密码cxthhhhh.com] wget --no-check-certificate -qO InstallNET.sh 'https://moeclub.org/attachment/LinuxShell/InstallNET.sh' && bash InstallNET.sh -dd 'https://oss.sunpma.com/Windows/Win_Server2003_86_Administrator_cxthhhhh.com.gz' # DD Windows Server 2008 R2 64位 精简版 [账户Administrator密码nat.ee] wget --no-check-certificate -qO InstallNET.sh 'https://moeclub.org/attachment/LinuxShell/InstallNET.sh' && bash InstallNET.sh -dd 'https://oss.sunpma.com/Windows/Win_Server2008R2_sp1_64_Administrator_nat.ee.gz' # DD Windows Server 2012 R2 64位 精简版 [账户Administrator密码WinSrv2012r2x64-Chinese] wget --no-check-certificate -qO InstallNET.sh 'https://moeclub.org/attachment/LinuxShell/InstallNET.sh' && bash InstallNET.sh -dd 'https://oss.sunpma.com/Windows/Win_Server2012R2_64_Administrator_WinSrv2012r2x64-Chinese.gz' # DD Windows Server 2019 Datacenter 64位 精简版 [账户Administrator密码WinSrv2019dc-Chinese] wget --no-check-certificate -qO InstallNET.sh 'https://moeclub.org/attachment/LinuxShell/InstallNET.sh' && bash InstallNET.sh -dd 'https://oss.sunpma.com/Windows/Win_Server2019_64_Administrator_WinSrv2019dc-Chinese.gz' # DD Windows7 32位 精简版 [账户Administrator密码Windows7x86-Chinese] wget --no-check-certificate -qO InstallNET.sh 'https://moeclub.org/attachment/LinuxShell/InstallNET.sh' && bash InstallNET.sh -dd 'https://oss.sunpma.com/Windows/Win7_86_Administrator_Windows7x86-Chinese.gz' # DD Windows7 sp1 64位 企业精简版 [账户Administrator密码nat.ee] wget --no-check-certificate -qO InstallNET.sh 'https://moeclub.org/attachment/LinuxShell/InstallNET.sh' && bash InstallNET.sh -dd 'https://oss.sunpma.com/Windows/Win7_sp1_64_Administrator_nat.ee.gz' #DD Windows8.1 64位 专业精简版 [账户Administrator密码nat.ee] wget --no-check-certificate -qO InstallNET.sh 'https://moeclub.org/attachment/LinuxShell/InstallNET.sh' && bash InstallNET.sh -dd 'https://oss.sunpma.com/Windows/Win8.1_64_Administrator_nat.ee.gz' #DD Windows8.1 64位 适量精简版 [账户Administrator密码Vicer] wget --no-check-certificate -qO InstallNET.sh 'https://moeclub.org/attachment/LinuxShell/InstallNET.sh' && bash InstallNET.sh -dd 'https://oss.sunpma.com/Windows/Win8.1_64_Administrator_Vicer.gz' # DD Windows10 2016LTSB 64位 企业深度精简版 [账户Administrator密码nat.ee] wget --no-check-certificate -qO InstallNET.sh 'https://moeclub.org/attachment/LinuxShell/InstallNET.sh' && bash InstallNET.sh -dd 'https://oss.sunpma.com/Windows/Win10_2016LTSB_64_Administrator_nat.ee.gz' # DD Windows10 2019LTSC 64位 企业适量精简版 [账户Administrator密码Vicer] wget --no-check-certificate -qO InstallNET.sh 'https://moeclub.org/attachment/LinuxShell/InstallNET.sh' && bash InstallNET.sh -dd 'https://oss.sunpma.com/Windows/Win10_2019LTSC_64_Administrator_Vicer.gz'完整版DD包# DD Windows Server 2012 R2 Datacenter 64位 完整版 [账户administrator密码Password147] wget --no-check-certificate -qO InstallNET.sh 'https://moeclub.org/attachment/LinuxShell/InstallNET.sh' && bash InstallNET.sh -dd 'https://oss.sunpma.com/Windows/Whole/cn_windows2012r2_administrator_Password147.gz' # DD Windows Server 2016 Datacenter 64位 完整版 [账户administrator密码Password147] wget --no-check-certificate -qO InstallNET.sh 'https://moeclub.org/attachment/LinuxShell/InstallNET.sh' && bash InstallNET.sh -dd 'https://oss.sunpma.com/Windows/Whole/cn_windows2016_administrator_Password147.gz' # DD Windows Server 2019 Datacenter 64位 完整版 [账户administrator密码Password147] wget --no-check-certificate -qO InstallNET.sh 'https://moeclub.org/attachment/LinuxShell/InstallNET.sh' && bash InstallNET.sh -dd 'https://oss.sunpma.com/Windows/Whole/cn_windows2019_administrator_Password147.gz' # DD Windows7 sp1 64位 [账户Administrator密码nat.ee] wget --no-check-certificate -qO InstallNET.sh 'https://moeclub.org/attachment/LinuxShell/InstallNET.sh' && bash InstallNET.sh -dd 'https://oss.sunpma.com/Windows/Whole/Win7_sp1_64_Administrator_nat.ee.gz' # DD Windows8.1 64位 [账户Administrator密码nat.ee] wget --no-check-certificate -qO InstallNET.sh 'https://moeclub.org/attachment/LinuxShell/InstallNET.sh' && bash InstallNET.sh -dd 'https://oss.sunpma.com/Windows/Whole/Win8.1_64_Administrator_nat.ee.gz' # DD Windows10 LTSC 64位 [账户Administrator密码nat.ee] wget --no-check-certificate -qO InstallNET.sh 'https://moeclub.org/attachment/LinuxShell/InstallNET.sh' && bash InstallNET.sh -dd 'https://oss.sunpma.com/Windows/Whole/Win10_LTSC_64_Administrator_nat.ee.gz'
-
-
无法连接连接打印机0x000003e3怎么解决? 无法连接连接打印机0x000003e3怎么解决,最近有不少用户遇到了无法连接到共享打印机的问题,导致无法打印,影响工作,那么遇到这个问题要如何解决呢?无法连接连接打印机0x000003e3怎么解决:1、点击桌面左下角的开始菜单,或按快捷键“win+R”打开运行框,然后在运行框中输入:gpedit.msc,然后按回车键。2、在弹出的本地组策略编辑器窗口中,依次点击计算机配置-Windows设置-安全设置-本地策略-安全选项,接着在右边找到【账户:使用空密码的本地账户只允许进行控制台登录】,双击这个选项。3、双击打开后,选择【已禁用】,然后点击【确定】;4、接下来,右键点击桌面的【计算机】,在弹窗中选择【管理】; 5、打开计算机管理后,依次点击系统工具-本地用户和组-用户,然后找到右边的Guest,并双击打开;6、在Guest属性界面,点击【隶属于】选项卡,在下面点击【添加】;7、在弹出的窗口中,如下图的地方输入:users,然后点击【确定】;8、接下来再回到Guest属性窗口,在隶属于选项中,选择users点击添加,然后点击下面的【确定】。上面的都是设置好后,到需要打印的电脑里面去添加打印机,一般这样就可以了。如果还是连接不了,重启电脑后再添加试试。方法二:可能是驱动方面出现了问题1、建议您先尝试卸载重装打印机驱动查看问题是否存在:2、Win+R打开运行,输入:devmgmt.msc打开设备管理器;3、展开打印队列,右键选中该打印机驱动,卸载设备,4、卸载完成后重启Windows下载系统推送的驱动程序或者;5、前往该品牌的官网下载对应型号的驱动程序。
-
CentOS 7 - 清除bash history 记录 清除操作 history 记录当前用户所有输入的命令都被记录在 ~/.bash_history 文件中,为了防止敏感信息泄露,可以执行history -c && history -w 或 history -c && > ~/.bash_history 命令清除这些历史记录。关于 history 命令的帮助信息:$ help history history: history [-c] [-d offset] [n] or history -anrw [filename] or history -ps arg [arg...] Display or manipulate the history list. Display the history list with line numbers, prefixing each modified entry with a `*'. An argument of N lists only the last N entries. Options: -c clear the history list by deleting all of the entries -d offset delete the history entry at offset OFFSET. -a append history lines from this session to the history file -n read all history lines not already read from the history file -r read the history file and append the contents to the history list -w write the current history to the history file and append them to the history list -p perform history expansion on each ARG and display the result without storing it in the history list -s append the ARGs to the history list as a single entry If FILENAME is given, it is used as the history file. Otherwise, if $HISTFILE has a value, that is used, else ~/.bash_history. If the $HISTTIMEFORMAT variable is set and not null, its value is used as a format string for strftime(3) to print the time stamp associated with each displayed history entry. No time stamps are printed otherwise. Exit Status: Returns success unless an invalid option is given or an error occurs.